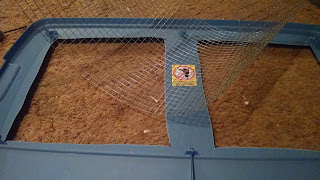
I wanted to share my nursery/grow out cage. A nursery cage is a separate cage for the momma rat to have & raise her babies in. It should be baby rat safe & secure. Being easy to get into and easy to get to the babies is also a huge plus. But it should also be large enough for the babies to grow up in. When you have like nine or so 3-4 week old rats, space is important!!
Most people use tanks, as in fish tanks. I am not a fan of tanks at all. They are too small, too heavy, difficult to move around, and has horrible ventilation. All of my rats also reacted very badly from being in a tank. They have lived in spacious cages their whole life and would freak out being in a tank. As I said they are also just far too small, while fine for pinkies. Once the rats have opened their eyes and begin getting mobile it just isn't suitable IMO. I also feel it doesn't give babies a fair learning experience. Rats need to climb & frolic.
The second option many people use is a bin cage. Which is what I made. A bin cage is when you use a plastic storage bin and cut out the sides/top and replace them with hardware cloth. The problem is that many people go way too small again. Shoe box sized or slightly larger just isn't fun :(
I really love that I can remove the entire lid and get inside to check on the babies/mom.
Some may dismiss the larger size as too much room for pinkies. But I disagree with that. I place a box in one side with high enough edges that pinkies & even week old rats won't be able to crawl out of. This keeps the babies contained and still gives mom lots of room.
You can add a wheel, hammocks, hanging baskets, shelves, toys, etc....
So I set out to create the perfect bin cage for my nursery!
NOTE: Plastic can be chewed through. This should in no way be used as a permanent cage. if you have serious chewers this may not be appropriate.
Here is the finished project:
So it isn't the most beautiful thing in the world but it is surely isn't as ugly as it could be either lol. I actually think it looks nice enough and not an eye sore. I am sure one could make it look nicer if they tried harder.
It was actually more difficult then I thought it would be. Quite a bit of work & there were some frustrating moments. I will fully admit, I am NOT handy in any way. I am prissy, whiny, and a huge accident prone clutz.
If you would like to make your own I'll go through the steps with you.
Click on the pics to see larger versions.
Supplies Needed:
A large plastic tub
Hardware cloth (0.5"-0.25")
Zipties or bolts & washers
A drill
Wire cutters
Small needle nose pliers
Utility Knife
Time: it took me like half a day to put together but my drill wasn't charged much and I had to keep stopping to let it charge some. But I imagine an hour or a couple hours seems about right.
For the plastic tub the larger the better. Try not to choose one with too thin of plastic as it could be flimsy & may break/crack during the process. But if you choose too thick of plastic it may be very difficult to work with. I actually used a tub I already had so I don't remember how much it cost. I would say $10-$30 is about right. You can buy them just about anywhere, including wal-mart, target, etc... I do prefer a lid that has snaps to be more secure.
The hardware cloth I bought at tractor supply, but u can get it at any hardware store. It is near the chicken wire, if you need to ask for help finding it. I bought a 24" by 10 foot roll and it was about $13. I still have lots left as well. I would have maybe preferred using 1/4 inch spacing of the squares but they didn't have it. I got 1/2 inch instead and that is perfectly fine. The babies won't escape through it. You want to get 1/2 inch or smaller though for sure. 1 inch would be far too big.
Alot of people use bolts & washers to secure the hardware cloth but I chose zipties instead. It is your choice. I bought a bag of 100 and maybe used half.
Tool wise, you definitely want some nice wire cutters to cut the hardware cloth down to size. I think it was maybe $5 around there somewhere. I used a very small pair of needle nose pliers to bend the ends of the hardware cloth as I couldn't cut the sharp ends off enough. A drill is super important. And I used a utility knife to cut the tub. You can use lots of different things to cut with- a saw, a dremel, etc...
Step 1: Draw out your windows
Take the tub and draw out squares on the lid and sides so you can easily cut them out later. I didn't have a ruler so I used a cereal box lol I left a small piece of plastic in the middle of the lid for alittle more support. You want to leave room around the windows to attach the hardware cloth.
I also prefer to make the windows alittle bit higher on the sides. So little babies will not be right against the mesh if they wonder around.
Step 2: Measure out the hardware cloth
You want the piece of hardware cloth to be LARGER then the squares. I made it a few holes larger on each side. You can be smart and have a ruler and measure the squares then measure the mesh or you can be like me and just line up the mesh to the squares and mark it then cut. NOTE: the hardware cloth is a pain to work with. It comes in a roll & will want to roll up on you. It is also alot of work to snip through it. Your hands will be getting a work out!
Step 3: Trim/bend the ends of the hardware cloth
After you cut the mesh the ends will be pointy & sharp. You obviously can not leave them like this as they may injure the rats. So you need to trim them smooth or bend them. I couldn't get them trimmed well enough, my cutters were huge though so maybe that is why. Instead I used the little pliers to bend each of the ends over.
Step 4: Cut out the squares
This is the hard part. My plan was to dremel them out, which was suggested to me. But apparently my dremel didn't have blades lol. So I was going to saw through them but I guess we only had a bowed type saw and so I would need a huge hole to get the saw into to begin with. Finally thanks to my husband we decided to use the utility knife.
We drilled holes in all 4 corners and then used the knife to cut them out. I didn't use the knife as I am sure I would have cut my arm off and I do not think I would have had the strength to actually get through the plastic. So if you are not so strong or careful you may need to get some assistance on this part. Safety first!
My husband had to use some strength to get the knife through but it went right through and was not difficult to remove them at all.
Drilling the holes was super easy. My husband did the first one because he was worried it would be difficult but it actually was super simple and went right through like butter.
Step 5: Setting up the mesh
When attaching the mesh you have to put it on the INSIDE of the tub. This will help prevent chewing and escapes. If you have the edge of the plastic on the inside they will chew on the edge and sooner or later have a hole.
I had alittle oops here because when I flipped the lid over I realized the lid had little plastic bits that got in the way of the mesh. I had to do some trimming of the mesh here.
You also want to lay out the mesh against the tub and using a marker put dots down through the holes where you will want to drill to attach it.
I made a few mistakes here, I didn't plan enough holes and had to make more. You want it very secure. Get the corners, along the top and sides.
Step 6: Drill Holes
Super easy, drill holes where you have marked the dots. Safety first!
Step 7: Attach the hardware cloth
REMEMBER THE MESH GOES ON THE INSIDE OF THE TUB!
Line up the mesh once again and attach it using zipties (or bolts). I suggest doing the corners first so it is properly aligned then the middle and then the rest. Make sure they are very tight.
Double check once you are done that it is tight and secure. Rats can wiggle through small spaces so the mesh needs to be tightly against the plastic. Try to push a finger underneath.
Add more holes if you need to.
Step 8: Trim the ends of the zipties
Step 9: All Done!
Cleaning up the mess you just made isn't so much fun. But you have successfully made a bin cage.
You should probably clean out the tub before using it. Make sure there are no pointy ends you may have missed and no left over trash bits inside.
This pic is to show how large it is. Cereal box & chair for size comparison. Excuse the mess (& ugly chair).
I am really happy with how it turned out. I am already using it. And my rat girl seemed quite content in it. The wire is great for fitting water bottles and she was happily climbing the sides. In the future I might remove the other two sides and replace them with mesh as well. I'm not sure as I feel it is very well ventilated with just the top and sides because of its size.
Decorating tips:
The height makes it lovely for decorating with hammocks, hanging baskets, you could even put in a shelf. Remember safety for the babies. But mom shouldn't have to give up her comforts.
I do suggest placing a box, smaller plastic tub, etc... in one side for the pinkies.
For other ideas just google bin cage. They are mostly used with hamsters and as I said most are made with quite small bins. But just use a larger tub and all will be well.
Updated pics with it in use to come.......


